Yoga is a calming and restorative practice that can help you relax and unwind at the end of the day. A national survey revealed that more than 55% of people who practice yoga reported improved sleep, while over 85% said it helped reduce stress levels. Using supportive props such as bolsters, blankets, and blocks can make poses more comfortable, allowing you to hold them longer and maintain steady, relaxed breathing.
Your breath plays a vital role in helping your body relax during these poses. In yoga, breathing is just as important—if not more important—than the physical posture itself. Practice a soothing breathing technique called Ujjayi Breath, also known as Ocean Breath or Victorious Breath. Inhale deeply through your nose, then exhale slowly through your nose while gently constricting the back of your throat, as if making a soft “ha” sound with your mouth closed. The breath should create a calming sound similar to ocean waves.
Use this slow, steady breathing pattern to relax and ground yourself in each pose. Practice these yoga poses right before bedtime, holding each one for about 3 to 5 minutes. Continue using Ocean Breath throughout the practice, except during Corpse Pose, where you can allow your breathing to return to its natural rhythm.
These seven restorative yoga poses help release stress, ease tension, and calm the mind at the end of the day. With regular practice, they may support deeper relaxation and improve the quality of your sleep.
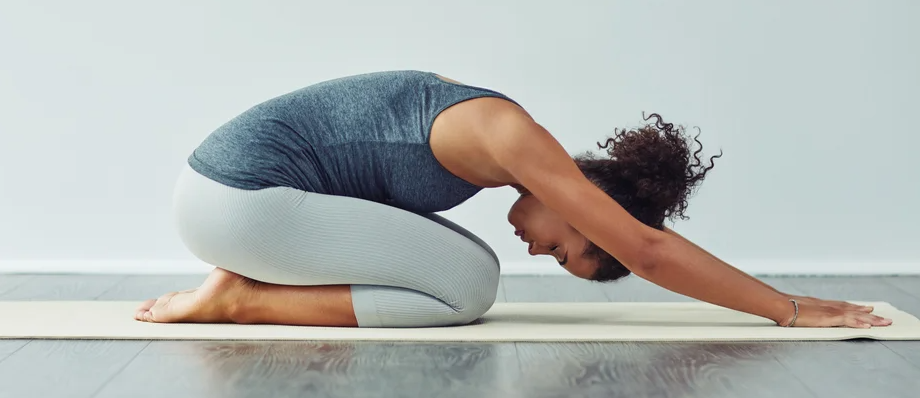
1. Wide-Legged Child’s Pose (Balasana)
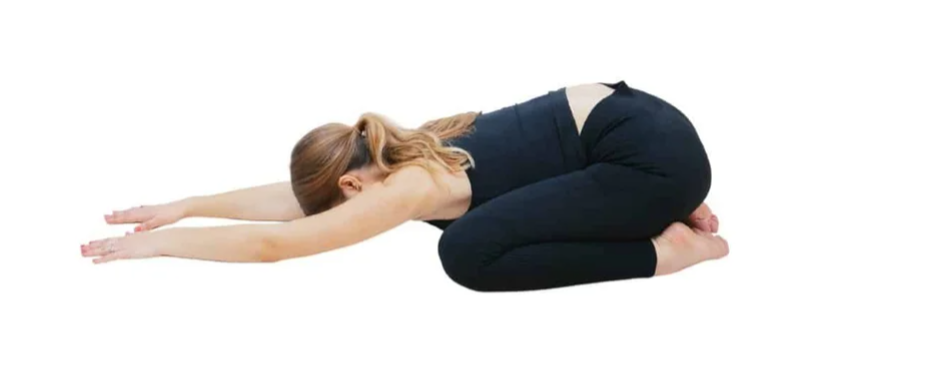
This gentle resting pose promotes relaxation, grounding, and a sense of stability. Avoid this pose if you have any hip or knee injuries, or practice with caution.
- Begin by kneeling on the floor with your big toes touching.
- Spread your knees either hip-width apart or as wide as the edges of your mat.
- Exhale slowly and lower your torso toward your thighs.
- Rest your hands alongside your body with your arms extending toward the back of the room and your palms facing upward. This position helps release tension in the shoulders by allowing the shoulder blades to widen apart.
- For a more active variation, stretch your arms forward with your palms resting on the mat.
- Place your forehead gently on the floor and slowly turn your head from side to side to ease tension around the forehead and brow.
- Maintain slow, calm, and steady breathing through your nose throughout the pose
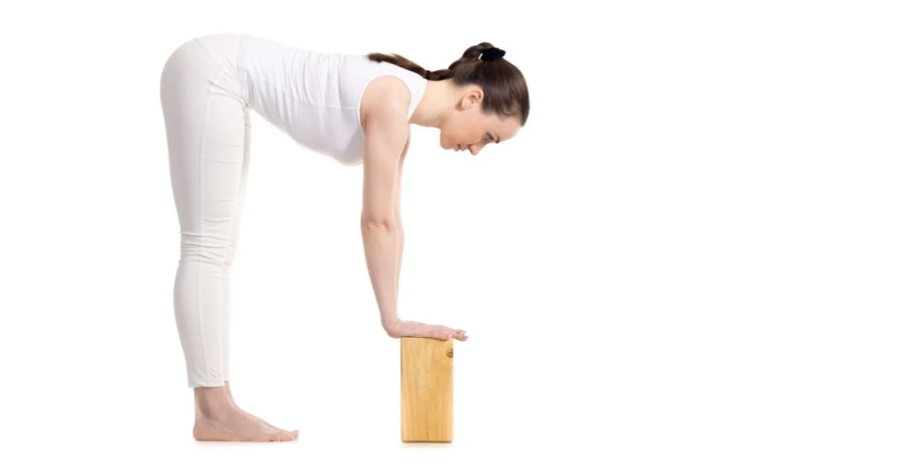
2. Standing Forward Fold (Uttanasana)
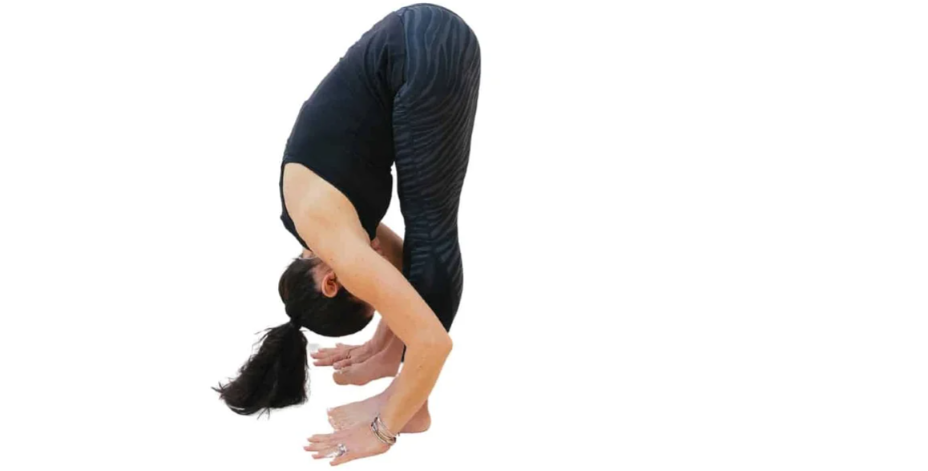
- Stand with your feet hip-width apart and take a deep inhale.
- As you exhale, gently fold your torso forward over your legs, lengthening your spine.
- You can hold opposite elbows, rest your hands on your shins, or place them on the floor.
- Avoid forcing yourself to touch the floor—the goal of this pose is not perfection, but to create length in the spine while relaxing the neck and shoulders.
- This calming forward fold helps release tension in the neck and provides a gentle stretch for the hamstrings, calves, and hips.
- Practice carefully if you have a back injury.
- If reaching the floor feels uncomfortable, place yoga blocks beneath your hands for additional support.
- Breathe slowly and smoothly through your nose throughout the pose.
- If your hamstrings feel tight, keep a slight bend in your knees so your chest can rest more comfortably on your thighs.
- Gently nod your head “yes” and shake it “no” to loosen tight neck muscles.
- To come out of the pose, slowly roll up to a standing position to prevent dizziness or light-headedness.
3. Standing Half Forward Fold (Ardha Uttanasana) Using the Wall
This is another variation of the Standing Forward Bend pose.
- Place your mat perpendicular to the wall.
- Stand about one foot away from the wall.
- Keep your feet hip-width apart and parallel to the edges of the mat.
- Press your palms against the wall at hip height, spreading your fingers wide.
- Step back while maintaining hip-width distance between your feet, and hinge forward until your torso forms a flat back position, perpendicular to the floor.
- Push the wall away with your palms to lengthen and extend your spine.
- Ground evenly through all four corners of your feet.
- Keep your ears aligned with your upper arms.
- Adjust your distance from the wall so your body creates a 90-degree “L” shape. If you stand too close, your arms and back cannot fully extend; if you stand too far, it becomes difficult to fold forward properly.
- Continue breathing deeply as you actively press the wall away and lengthen through your spine.
4. Reclined Bound Angle Pose (Supta Baddha Konasana)
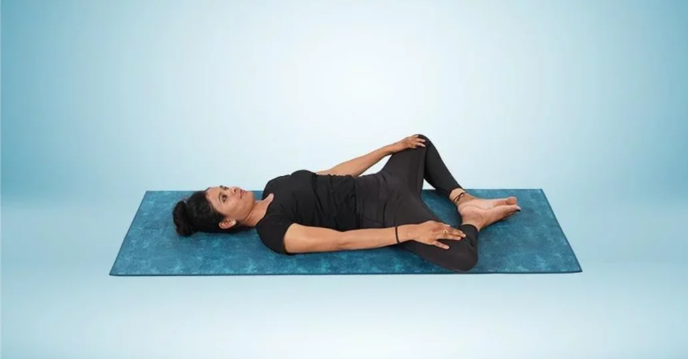
This pose helps release tension in the hips and groin area. Use caution if you have any knee, hip, or groin injuries.
- Lie comfortably on your mat.
- Bend your knees and place your feet on the floor close to your tailbone.
- Bring the soles of your feet together and allow your knees to gently fall outward. Place blocks or firm cushions under each knee for support.
- If your hips feel tight, move your feet slightly farther away from your tailbone or add extra support beneath your knees.
- Rest your arms on the floor at about a 45-degree angle from your torso, with your palms facing upward.
- Avoid pressing your knees down, as gravity will naturally deepen the stretch.
- You should feel a mild stretch through the hips and groin without any pain or discomfort.
5. Legs-Up-the-Wall Pose (Viparita Karani)
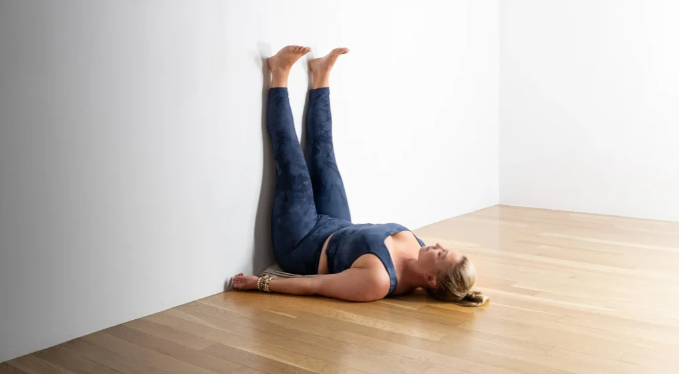
After a long day—especially if you spend a lot of time standing—your feet and ankles may feel swollen or fatigued. This gentle restorative pose helps improve circulation and encourages relaxation.
- Find an open wall space and place your mat perpendicular to the wall.
- Sit sideways on the mat with either your left or right hip as close to the wall as possible.
- Gently lower your back onto the mat as you swing your legs up against the wall.
- Allow your arms to rest comfortably by your sides.
- Optional: Place a rolled blanket, bolster, or firm cushion under your tailbone for additional support and comfort.
6. Resting Pose (Savasana)
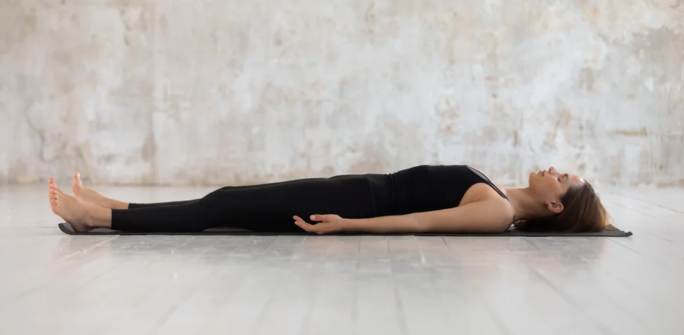
Corpse Pose is the traditional resting posture practiced at the end of a yoga session. Allow your breathing to settle into a natural rhythm as you relax fully into the pose.
- Exhale and extend your legs comfortably away from your body while keeping your tailbone grounded on the mat.
- Let your feet relax naturally outward, about hip-width apart.
- Soften your lower back and allow any tension to release. You should not feel discomfort or strain in the lower back.
- Rest your arms comfortably alongside your body with your palms facing upward.
- Check that your shoulders are relaxed and gently moving away from your ears.
- Optional: Place a folded towel or eye pillow over your eyes to block light and encourage deeper relaxation.
7. Legs Resting on a Chair Pose

This pose is a gentle alternative for those who may find it uncomfortable to fully extend their legs up the wall due to lower back, knee, or hip concerns.
- Place a chair at the end of your yoga mat facing toward you.
- Lay a folded towel or blanket on the chair seat for cushioning. Depending on the chair height, you may also place folded blankets under your sacrum for extra support.
- Sit on the mat close to the front edge of the chair.
- Lower yourself onto one side in a fetal position with your knees bent, then carefully shift to the center of the mat.
- Roll onto your back and place your calves comfortably on the chair seat with your knees bent.
- Keep your thighs at approximately a 90-degree angle to your shins.
- Relax your arms by your sides with your palms facing upward.